Are you tired of fumbling around in dimly lit kitchen cabinets, or worried about the safety of your under-cabinet lighting setup? Improper wiring in kitchens and bathrooms, especially near water sources, can be a recipe for disaster – from electric shocks to potential fires. This guide will walk you through the essentials of wiring kitchen cabinets and under-cabinet lighting safely and efficiently, so you can enjoy a well-lit and secure culinary space.
Proper kitchen and bathroom wiring is paramount for the safety and functionality of your home. These areas are high-use zones where electrical demands are often significant, and the presence of water increases the risk of electrical hazards. Code-compliant wiring, including the use of Ground Fault Circuit Interrupter (GFCI) outlets and carefully planned lighting circuits, protects your family and ensures your appliances and lighting operate reliably. Plus, thoughtful energy-efficient wiring choices can save you money on your electricity bill in the long run. It is also important to note that in many jurisdictions, electrical work requires permitting and inspection to ensure it complies with local codes. Failing to obtain the necessary permits and inspections can result in fines or the need to redo the work.
Ready to dive in? Here are a few critical tips to keep in mind as we proceed. Always prioritize safety by turning off the power at the breaker before starting any electrical work. Double-check that the circuit is de-energized using a non-contact voltage tester. When working with electrical wiring in kitchens or bathrooms, GFCI protection is crucial. Ensure that all outlets within a certain distance of water sources (typically 6 feet) are GFCI-protected. Consider the placement of your lighting fixtures and plan your circuit layout accordingly to avoid overloading circuits. If you're tackling this project yourself, exercise extreme caution and consult with a qualified electrician if you have any doubts or concerns. DIY electrical work can be dangerous if not done properly.
Planning Your Kitchen Cabinet and Under-Cabinet Lighting Wiring
The foundation of any successful electrical project is meticulous planning. Before you even think about picking up a wire stripper, take the time to map out your entire kitchen cabinet and under-cabinet lighting scheme. This includes determining the type of lighting you want, the placement of each fixture, and how you’ll route the wiring.
Choosing the Right Type of Under-Cabinet Lighting
Under-cabinet lighting has come a long way in recent years. You now have a wide array of options to choose from, each with its own set of advantages and disadvantages.
LED Strip Lights: These are highly energy-efficient, long-lasting, and versatile. They're easy to install and can be cut to the exact length you need. LED strip lights come in various color temperatures, allowing you to create the perfect ambiance for your kitchen. Puck Lights: These small, circular lights provide focused illumination. They're a good choice for highlighting specific areas or objects. Puck lights can be surface-mounted or recessed. Linear Lights:These are longer, tube-shaped lights that provide even illumination across a wider area. They're ideal for illuminating countertops.
Consider the overall aesthetic of your kitchen when selecting your under-cabinet lighting. Do you prefer a sleek, modern look or a more traditional feel? The type of lighting you choose should complement your kitchen's design. Don't forget to factor in the color temperature of the lights. Warmer color temperatures (2700K-3000K) create a cozy, inviting atmosphere, while cooler color temperatures (4000K-5000K) provide brighter, more task-oriented lighting.
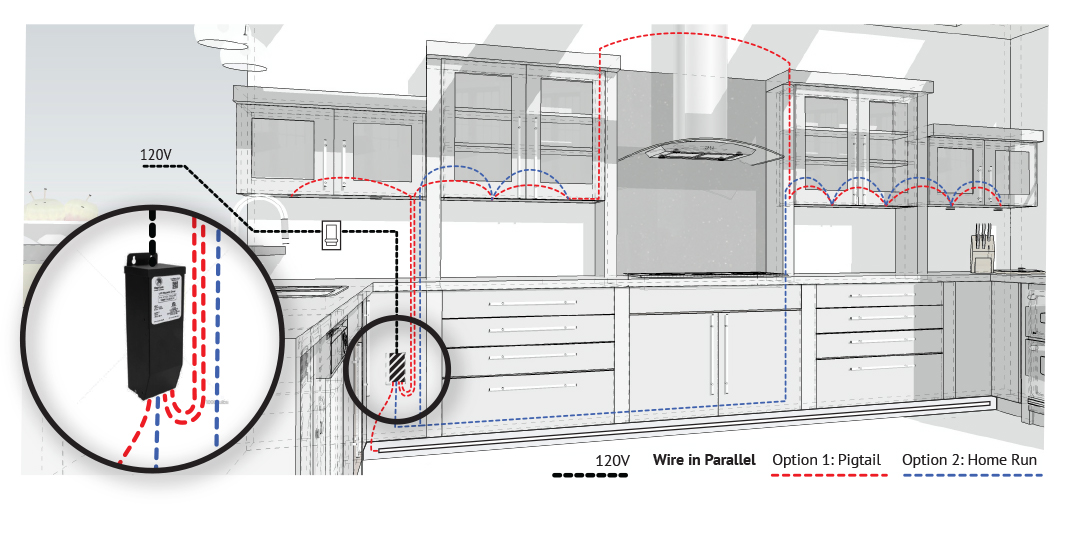
Mapping Out Your Wiring Plan
Once you've chosen your lighting, it's time to create a detailed wiring plan. This will help you determine the materials you need and ensure that your wiring meets code requirements.
1.Identify the Power Source: Determine where you'll be tapping into your existing electrical system. Ideally, you'll want to connect to a dedicated circuit with enough capacity to handle the additional load of your under-cabinet lighting.
2.Plan the Wiring Route: Map out the path the wiring will take from the power source to each light fixture. Consider using existing wall cavities or running the wiring behind the cabinets. Ensure the wire is secured properly and protected from physical damage.
3.Determine the Number of Outlets: Decide how many outlets you'll need for your under-cabinet lighting and any other appliances or devices you plan to plug in. Remember to include GFCI-protected outlets within 6 feet of any water source.
4.Check Local Codes: Review your local electrical codes to ensure your wiring plan complies with all requirements. This is crucial for safety and to avoid potential problems with inspections.
A well-thought-out wiring plan will save you time and frustration during the installation process. It will also help you avoid costly mistakes and ensure that your kitchen wiring is safe and code-compliant.
Step-by-Step Guide to Wiring Kitchen Cabinets and Under-Cabinet Lighting
Now that you have a solid plan in place, it's time to get to work. This step-by-step guide will walk you through the process of wiring kitchen cabinets and under-cabinet lighting safely and efficiently.
Safety First: Disconnect the Power
Before you touch any wires, it's absolutely essential to disconnect the power to the circuit you'll be working on. Locate the circuit breaker that controls the circuit and switch it to the "off" position. To be absolutely sure that the circuit is de-energized, use a non-contact voltage tester to check the wires.
Running the Wiring
Running the wiring for your under-cabinet lighting involves connecting the power source to each light fixture. This may involve running wires through walls, behind cabinets, or under the floor.
1.Drill Access Holes: Drill small access holes in the cabinets or walls as needed to run the wiring. Be careful not to drill into any existing wiring or plumbing.
2.Install Wiring: Run the appropriate type of electrical wire (typically NM-B cable) from the power source to each light fixture. Secure the wiring with staples or cable ties to prevent it from sagging or coming into contact with sharp objects.
3.Use Cable Connectors: At each junction box or light fixture, use cable connectors to properly secure the wiring. This will prevent the wires from pulling loose and creating a potential hazard.
Installing Outlets and Switches
If you're adding new outlets or switches for your under-cabinet lighting, follow these steps:
1.Install Junction Boxes: Install junction boxes at each outlet or switch location. The junction boxes should be securely mounted to the wall or cabinet.
2.Wire the Outlets and Switches: Connect the wires to the appropriate terminals on the outlets and switches. Be sure to follow the wiring diagram that comes with the devices.
3.Grounding is Crucial: Ensure that all outlets and switches are properly grounded. Connect the ground wire (usually green or bare copper) to the ground terminal on the device.
Connecting the Lighting Fixtures
Now it's time to connect the lighting fixtures to the wiring.
1.Follow Manufacturer's Instructions: Carefully follow the manufacturer's instructions for connecting the lighting fixtures.
2.Wire Connections: Use wire connectors (such as wire nuts) to make secure connections between the fixture wires and the building wiring.
3.Mount the Fixtures: Securely mount the lighting fixtures to the underside of the cabinets or to the wall.
Testing and Final Checks
After you've completed the wiring, it's important to test everything to ensure it's working properly and safely.
1.Double-Check Your Work: Before restoring power, double-check all your wiring connections to ensure they are secure and properly insulated.
2.Restore Power: Turn the circuit breaker back on and test the outlets and switches.
3.Test GFCI Outlets: Test the GFCI outlets by pressing the "test" button. The outlet should trip, indicating that it's working properly.
Essential Tools and Materials
Having the right tools and materials on hand will make your kitchen cabinet and under-cabinet lighting wiring project much easier and safer. Here's a list of essentials: Non-Contact Voltage Tester: To verify that the power is off before working on any wires. Wire Strippers: To remove the insulation from electrical wires. Wire Cutters: To cut electrical wires to the desired length. Pliers: For gripping and manipulating wires. Screwdrivers: Both flathead and Phillips head screwdrivers will be needed. Drill with Drill Bits: To drill access holes for running wires. Electrical Tape: To insulate wire connections. Wire Connectors (Wire Nuts): To make secure connections between wires. NM-B Cable (Romex): The appropriate type of electrical wire for most residential wiring applications. Junction Boxes: To house electrical connections. Cable Connectors: To secure the wiring to the junction boxes. Outlets and Switches: As needed for your project. GFCI Outlets: For locations near water sources. Lighting Fixtures: Your chosen under-cabinet lighting. Safety Glasses: To protect your eyes from debris. Gloves: To protect your hands from electrical shock.
Troubleshooting Common Problems
Even with careful planning and execution, you might encounter some problems during your kitchen cabinet and under-cabinet lighting wiring project. Here are some common issues and how to troubleshoot them: Lights Don't Turn On:
Check the circuit breaker to make sure it hasn't tripped.
Verify that all wiring connections are secure.
Test the light bulbs or LED fixtures. Outlets Don't Work:
Check the circuit breaker.
Test the outlet with a voltage tester to see if it's receiving power.
Inspect the wiring connections to the outlet. GFCI Outlet Trips Repeatedly:
This usually indicates a ground fault. Check the wiring for any exposed wires or loose connections.
Try resetting the GFCI outlet. If it continues to trip, there may be a problem with the outlet itself or with the wiring in the circuit. Flickering Lights:
This could be caused by loose wiring connections, a faulty light fixture, or voltage fluctuations.
Check the wiring connections and tighten any loose connections.
Try replacing the light fixture.
If you're unable to resolve the problem yourself, it's best to consult with a qualified electrician.
People Also Ask (FAQs)
How much does it cost to have under-cabinet lighting installed?
The cost can vary widely depending on the type of lighting, the complexity of the wiring, and your location. Expect to pay anywhere from \$100 to \$500 per fixture installed by a professional electrician. DIY installation can save on labor costs but requires careful planning and execution to ensure safety and code compliance.
Can I install under-cabinet lighting myself?
Yes, but only if you have a solid understanding of electrical wiring and are comfortable working with electricity. Always prioritize safety by turning off the power, using the right tools, and following all local codes. If you're unsure about any aspect of the project, it's best to hire a qualified electrician.
Do I need a permit to install under-cabinet lighting?
In many jurisdictions, a permit is required for electrical work, including installing under-cabinet lighting. Check with your local building department to determine the requirements in your area. Obtaining a permit ensures that your work is inspected and meets code standards.
Wiring kitchen cabinets and under-cabinet lighting is a rewarding project that can enhance the functionality and beauty of your kitchen. By following this guide and prioritizing safety, you can achieve professional results and enjoy a well-lit and secure culinary space. Remember, if you're ever unsure about any aspect of the project, don't hesitate to consult with a qualified electrician. With careful planning and execution, you can bring your kitchen lighting vision to life!

Posting Komentar